
The Seadog Sweater - Pattern and Tutorial
A simple raglan jumper that can be whipped up in no time to give that super squishy, cosy, winter warmth.

There’s nothing quite like a proper winter by the sea — the waves crashing, the air crisp and salty, and the skies a moody grey that makes you want to wrap up in something warm and comforting. That’s exactly my inspiration for the Seadog Sweater. I wanted to create a jumper that feels effortless to wear, whether you’re curling up at home with a cuppa, heading out for lunch with friends, or layering under a smart coat for a winter walk along the coast.
The Seadog is based on a crochet-friendly take on the classic fisherman’s rib. It’s one of those stitches that looks far more complicated than it is — I’ve even had people ask if it’s brioche knitting! But once you get the hang of it, the texture is incredibly satisfying to work, super squishy, and has a lovely drape thanks to working it in aran/worsted weight yarn with a 6mm hook.
This jumper is designed as a fitted raglan, so it gently hugs the body and follows your shape. If you prefer a slightly looser, more relaxed fit, just size up — it’s very forgiving in that way. The style is contemporary, yet the subtle rustic texture gives it a cozy, seaside-worn charm. Perfect for elevating your everyday winter wardrobe without feeling fussy.
Below, you’ll find a video tutorial and written instructions. I always say: follow the video first, and use the written notes to jog your memory as you go. The Seadog Sweater is designed to be wearable, flattering, and a little bit addictive to crochet — the kind of winter jumper you won’t want to take off.
Sizing information
Like all of my patterns, the Seadog Sweater is designed with flexibility in mind. This is a fitted raglan jumper that’s meant to hug the body rather than hang loosely, giving it that clean, contemporary shape that works just as well under a coat as it does on its own. If you prefer a more relaxed fit, simply size up — the construction makes this easy to do without affecting the overall look.
If you’ve never made a raglan before, don’t panic. It’s one of those techniques that sounds far more intimidating than it actually is. You’ll begin at the neckline and work downwards, increasing at four clearly defined points to create those classic diagonal raglan lines. One of my favourite things about this construction is that you can try the jumper on as you go, adjusting length and fit until it feels right for you.
The pattern includes sizes from XXS to 5XL, based on standard unisex sizing. If you’re making this for yourself, you can rely on your usual size as a starting point. If you’re making it for someone else (or want a bit of reassurance), having at least one key measurement — such as chest circumference — is always helpful to avoid ending up with something a little more… tent-like than intended.
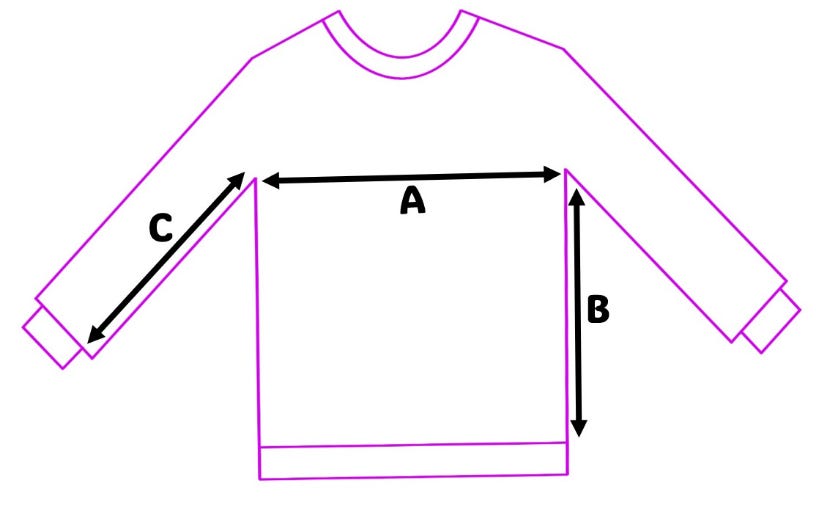
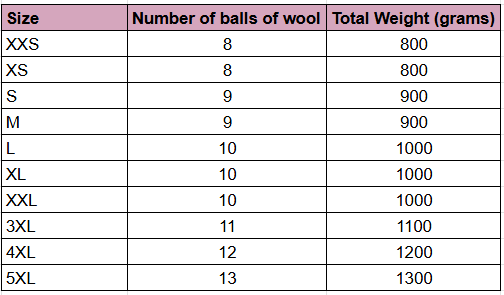
I’ve included a full schematic with measurements below, and I also walk you through exactly how to use it in the video tutorial, so you won’t be left guessing at any stage. Beneath the schematic you’ll also find a yarn estimate chart for each size. Just keep in mind that these quantities are based on the yarn I used and my personal tension — yours may vary slightly.

Quantity of Yarn
A quick but important note before you dive in: yarn usage can vary a lot. I’ve found that the amount of yarn I personally use often differs from what a pattern suggests — sometimes by quite a bit, in either direction. Your tension, hook choice, yarn brand, fibre content, and even how snugly you like to work your stitches can all affect how much yarn you’ll need.
For the video tutorial, I used King Cole Bounty ARAN, which is 100% “premium” acrylic. If you choose a different fiber blend — especially wool, wool blends, or anything with more bounce or drape — you may find the yardage per ball changes, sometimes significantly.
The table below should be used as a guide rather than a guarantee. It’ll give you a solid starting point, but if your budget allows, I’d strongly recommend grabbing an extra ball just in case. There’s nothing worse than being one sleeve away from finishing and realizing you’ve run out… ask me how I know.
Written Instructions
Hook: 4.5mm and 6mm
Yarn: Aran/Worsted weight yarn
Skill Level: Intermediate
Abbreviations
ch = chain
sl st = slip stitch
sc = single crochet
fsc = foundation single crochet
sc2tog = single crochet 2 tog
dc = double crochet
fdc = foundation double crochet
fpdc = front post double crochet
bpdc = back post double crochet
foundfpdc = foundation front post double crochet
foundbpdc = foundation back post double crochet
pdc3tog = post double crochet 3 together
st = stitch
fdc = foundation double crochet
V-Stitch = double crochet, chain 1, double crochet in the same space
Collar
NOTE: I will say this through out but watch the you tube tutorial. It will be super helpful and I explain things way better.
Using the 4.5mm hook chain 17 and sc into the second chain from the hook.
sc into each chain stitch along
Turn your work and either chain 1 OR fsc into the last stitch of the previous row.
sc into the back loop only of the remaining stitches from the previous row.
REPEAT steps 3 and 4, 78 more times (80 total rows)
making sure the right sides are facing each other and there isn’t a twist in your collar, sl st the 2 ends together to create a single loop
changing to your 6mm hook and folding the loop in half length ways (watch the video tutorial) ch 1 and then sc the two long edges together working into the side of each row until you reach back to the point you started.
sl st into the ch 1 you started your round with.
You should have 80 sc all around
Round 1:
NOTE: Watch the video, I’m always going to say it so I’ll say it again.
Work 1 fdc into the chain you slip stitched into
dc into the next 23 sc stitches
V-Stitch in the next sc stitch
dc in the next 15 sc stitches
V-Stitch in the next sc stitch
dc into the next 23 sc stiches
V-Stitch in the next sc stitch
dc in the next 15 sc stitches
dc into the same space as the fdc you did at the start, place a sc into the top of the fdc you did at the start of the round.
Round 2 (we are starting to increase):
NOTE: NOTE: This is an increase round and all rounds after this will be increase rounds until you break for the body/arms. Again I would say watch the video tutorial as it gets explained much better. Do not turn your work, we will be continuing working in the round.
Place a fdc into the gap you have just created by sc into the top of the fdc from the previous row
fpdc, bpdc alternating until you reach the chain 1 gap created by the next V-stitch of the previous round
V-stitch into the chain one space of the V-stitch of the previous round
repeat steps 2 and 3 until you get back to the start of the round
dc into the same space as the fdc you did at the start, place a sc into the top of the fdc you did at the start of the round.
Round 3 (increases continue):
NOTE: We are essentially repeating round 2, however your alternating
Place a fdc into the gap you have just created by sc into the top of the fdc from the previous row
bpdc, fpdc alternating until you reach the chain 1 gap created by the next V-stitch of the previous round
V-stitch into the chain one space of the V-stitch of the previous round
repeat steps 2 and 3 until you get back to the start of the round
dc into the same space as the fdc you did at the start, place a sc into the top of the fdc you did at the start of the round.
Round 4 (and onwards for now):
NOTE: Give the video tutorial a watch to understand how to use the schematic and measure size.
Repeat round 3 until your jumper has met the required measurements (Measurement A pit to pit) for the size you are wanting to make.
German short rows:
NOTE: Again the video tutorial will do a better job explaining this, we are going to use German short rows to make the back slightly longer and help with fit and shaping
This first row is worked in the same way as you would an increase round. fdc into the corner space you have just created and then continue working, your repeating fpdc, bpdc until you reach the next V-stitch.
In the V-stitch place a dc and turn your work.
do a fdc or foundfpdc (depending on your fpdc/bpdc repeat) and then continue to work back along the additional row you have just created until you get back to the start of the round.
You should have now added in 2 additional rows on the back of the jumper.
Closing the arm hole:
NOTE: You should now have 2 additional rows at the back of your jumper. I’ll say it again as well, the video tutorial will help you here..
Without fastening off your yarn from your german short rows, ch 2 and sl st into the centre of V-stitch at the other end of the shorter (arm) side of the jumper and fasten off, cutting your yarn with a 6 inch tail..
Place a slip knot onto your hook, place your hook into the top of your German short row (the other side on the back of the jumper), sl st then ch 2 and sl st into the the centre of V-stitch at the other end of the shorter (arm) side of the jumper. DO NOT FASTEN OFF, WE ARE GOING TO CONTINUE AND WORK THE BODY FROM HERE.
Working the body (Round 1):
NOTE: Watch the video, I explain the first round so much better
Work a foundfpdc or foundbpdc depending on the way your repeat has ended. This is around one dc stitch from the V-stitch of the previous round.
Follow the fpdc, bpdc repeat all the way across to the other arm pit.
Place 2 dc around the chains you added into the arm pit.
Continue working the fpdc and bpdc repeat all the way along until you reach the armpit join we started the round with, place 2 dc around the chains you added into the armpit.
sl st into the top of the foundfpdc or foundbpdc you did at the start of the round.
Round 2 (this is the body repeat round):
foundfpdc or foundbpdc depending on which stitch your repeat starts with.
continue your fpdc, bpdc repeat all the way around.
sl st into the top of the foundfpdc or foundbpdc you did at the start of the round.
Repeat ROUND 2 until your jumper reaches either measurement B (pit to bottom) or you try it on and like the length. Remember you will be adding a ribbed cuff at the bottom that will be about 2 inches so don’t make it to long if not using the measurement schematic.
The Bottom cuff/ribbing:
NOTE: As I always say, give the video a watch. This is joined as you go to the body edge.
Change back to your smaller hook (4.5mm)
ch 9 and then sc into the second chain from your hook and in each ch across.
sl st into the next 2 stiches of the body edge and turn your work
skipping the 2 sl st, sc into the back loop only of each stitch along, ch 1 and turn your work
sc into the back loop only of each sc of the previous row, sl st into the next 2 stitches of the body edge and turn your work.
Repeat steps 4 and 5 until you have worked around the entire bottom edge of your jumper
Once you make it back to the start fasten off your work leaving a long tail. Use this tail to seam the 2 edges together, fasten off and weave in the remaining tail.
The arms:
NOTE: Remember to change back to your 6mm crochet hook for this section until you get to the cuffs. ALSO we are going to continue working in the round so keep your make sure that your jumper is the right way round. Watch the video, I explain it way better there.
Round 1:
Changing to you 6mm hook, place a slip knot on your hook.
Work a fdc into the between the 2 dc you placed into the arm pit when working the body.
Work DC into the next space along.
Work a fpdc or bpdc depending on the stitch your repeat starts with and continue working all the way around doing your fpdc/bpdc repeat until you get to the point at which your german short rows start.
Working down the side of the short rows add in additional stitches, working towards the arm pit.
place a final dc into the space at the side of the dc you worked. You should have 3 dc worked around the chains you added into the armpit.
THIS IS IMPORTANT SO DO READ IT! Count your stitches in this round! You want to make sure it is an even number or your fpdc/bpdc repeat will not work!
ALSO you want to make a note of how many stitches are in your first round so that when you make your second sleeve you can make sure you have the same amount of stitches in your first round so your sleeves are the same size.
Round 2 (normal round):
Working either a foundfpdc or foundbpdc based on what your repeat needs to start withwork a round of fpfc, bpdc repeat, sl st into your foundation stitch.
Contine to work a round of fpfc, bpdc repeat
sl st into your foundation stitch.
Round 3 (decrease round):
NOTE: Watch the video for help with understanding how to do a pdc3tog (post double crochet 3 together)
work your foundfpdc or foundbpdc
pdc3tog, continue working the repeat fpdc, bpdc until you have 3 stitches left
pdc3tog, sl st into your foundation stitch.
Round 4 onwards:
Work two normal rounds of stitches (same as round 2) and then one decrease round as a 3 round repeat.
If your making the jumper for yourself you can keep working the 3 round repeat until your arm is at a width you are happy with, NOTE THOUGH, write down what your final stitch count is after decreasing so you can decrease to the same number for your other arm.
If you are making your jumper for someone else then for a nice fit I use the 60% rule. This means that I want the sleeve to finish at about 60% of its original width, for this you will want to do some maths, I’ll show you an example below.
My original stitch count for my arm in the video was 70 stitches in a round.
I take the 70 stitches and divide this number by 100
70 ÷ 100 = 0.7
I then take that 0.7 number and times it by 60 to get 60%
0.7 x 60 = 42
So I will keep decreasing my sleeve until it is 42 stitches in the round.
Once you have finished decreasing:
Repeat Round 2 (normal round) until your arm reaches the required 18 inches (measurement B on the schematic) or you try your jumper on the arm reaches your desired length.
The sleeve cuff:
NOTE: Change now to your smaller (4.5mm) crochet hook. This will help to tighten the arm hole. Also again look at the video, its much better at explaining it.
fsc in the same stitch you sl st into at the end of your last round, sc in the next stitch and then sc2tog
repeat the pattern of sc, sc, sc2tog until you get back to the start of the round. If you find your stitch count does not allow for you to finish the 3 stitch repeat, don’t worry just finish where you end up.
sl st into your fsc
Working the cuff, this is the same as working the bottom ribbing at the bottom of the jumper:
ch 9 and then sc into the second chain from your hook and in each ch across.
sl st into the next 2 stiches of the body edge and turn your work
skipping the 2 sl st, sc into the back loop only of each stitch along, ch 1 and turn your work
sc into the back loop only of each sc of the previous row, sl st into the next 2 stitches of the body edge and turn your work.
Repeat steps 4 and 5 until you have worked around the entire bottom edge of your jumper
Once you make it back to the start fasten off your work leaving a long tail. Use this tail to seam the 2 edges together, fasten off and weave in the remaining tail.
REPEAT THE ARM INSTRUCTIONS FOR YOUR OTHER ARM.
Weave in all your ends and you now have a finished Seadog Sweater.
Just finished it soo fun thanks